Tuesday, September 29, 2020

View WiFi Password in Windows

https://www.online-tech-tips.com/computer-tips/view-saved-wifi-passwords-windows/


I’ve already written about how to view WiFi passwords on a Mac and in this article, I’m going to talk about doing the same thing in Windows. Note that the procedure is the same for Windows 7, 8 or 10. Also, be sure to check out the YouTube video we made below, in case you don’t want to read so much text.


In order to view the WiFi password on your Windows machine, you need to make sure you are already connected to the WiFi network or have previously connected to the WiFi network. If so, then go ahead and right-click on the WiFi icon in the system tray and choose Open Network and Sharing Center.

open network sharing center

Now go ahead and click on Change Adapter Settings in the left-hand menu. Also, be sure to read my previous post if you want to learn more about the Network and Sharing Center.

change adapter settings

Find the icon for Wi-Fi, right-click on it and choose Status.

wifi status

This will bring up the WiFi Status dialog where you can see some basic information about your wireless network connection.

wireless properties

Click on the Wireless Properties button and then click on the Security tab.

network security key

Here you will see a text field called Network security key. Go ahead and check the Show characters box and you’ll now be able to see the WiFi security password. Note that this is just the WiFi password of the currently connected WiFi network. What if you want to see the WiFi passwords for WiFi networks that your computer previously connected to?

Luckily, that’s pretty easy too in Windows 7. In Windows 8 and 10, you have to use the command prompt, which is pretty annoying. Anyway, in Windows 7, open the Network and Sharing Center and then click on Manage Wireless Networks.

manage wireless networks

You will now see a nice list of all the wireless networks that computer has ever connected to. Just double-click on the one you are interested in.

list of wireless networks

Then just click on the Security tab and check the Show characters box again to see the password.

windows 7 wifi key

In Windows 8 and 10, you have to open a command prompt by going to Start and typing in CMD. When the command prompt opens, type in the following command:

netsh wlan show profiles

wlan netsh

You’ll find all the wireless profiles listed under User Profiles. The name of the WiFi network is on the right. In my case, I only have one WiFi network listed. Now to see the password for a profile, type in the following command:

netsh wlan show profile name=profilename key=clear

Go ahead and replace profilename with the actual name of the WiFi network listed from the previous command. In my case, the WiFi network is named VFTJM. You do not need to use quotes anywhere in the commands.

profile key

When you run the second command, you’ll get a lot of output, but you are only interested in finding the line that starts with Key Content. To the right will be the WiFi password. I’m not sure why Microsoft removed the convenience of seeing all your previously connected WiFi networks in Windows 8 and 10, but thankfully there is still a way to get all of the information. If you have any questions, feel free to comment. Enjoy

Wednesday, April 15, 2020

What Is a Checksum (and Why Should You Care)?


https://www.howtogeek.com/363735/what-is-a-checksum-and-why-should-you-care/


A checksum is a sequence of numbers and letters used to check data for errors. If you know the checksum of an original file, you can use a checksum utility to confirm your copy is identical.

Checksums Explained

To produce a checksum, you run a program that puts that file through an algorithm. Typical algorithms used for this include MD5, SHA-1, SHA-256, and SHA-512.
The algorithm uses a cryptographic hash function that takes an input and produces a string (a sequence of numbers and letters) of a fixed length. The input file can be a small 1 MB file or a massive 4 GB file, but either way, you’ll end up with a checksum of the same length. Checksums may also be called “hashes.”
Small changes in the file produce very different looking checksums. For example, we created two different text files that are almost the same, but one has an exclamation point where the other has a period. After running Windows 10’s built-in checksumming utility on them, we saw very different checksums. A single character difference in the underlying file produces a very different looking checksum.

When Checksums Are Useful

You can use checksums to check files and other data for errors that occur during transmission or storage. For example, a file might not have properly downloaded due to network issues, or hard drive problems could have caused corruption in a file on disk.
If you know the checksum of the original file, you can run a checksum or hashing utility on it. If the resulting checksum matches, you know the file you have is identical.
Computers use checksum-style techniques to check data for problems in the background, but you can also do this yourself. For example, Linux distributions often provide checksums so you can verify your Linux ISO properly downloaded before burning it to a disc or putting it on a USB drive. You could also use checksums to verify the integrity of any other type of file, from applications to documents and media. You just need to know the checksum of the original file.

What’s the Difference Between MD5, SHA-1, and SHA-256 Sums?

Checksums are a useful way to ensure that a file doesn’t have an error. If a random error occurs due to download problems or hard drive issues, the resulting checksum will be different, even if it’s just a tiny error.
However, these cryptographic hash functions aren’t perfect. Security researchers have found “collisions” with the MD5 and SHA-1 functions. In other words, they’ve found two different files that produce the same MD5 or SHA-1 hash, but are different.
This is unlikely to happen through random chance, but an attacker could use this technique to disguise a malicious file as a legitimate file. That’s why you shouldn’t rely on MD5 or SHA-1 sums to verify that a file is authentic—just to check for corruption.
There haven’t been any reports of an SHA-256 collision yet, which is why applications are now creating SHA-256 sums instead of MD5 sums and SHA-1 sums. SHA-256 is a stronger, more secure algorithm.
Different checksum algorithms produce different results. A file will have different MD5, SHA-1, and SHA–256 checksums. If you only know the MD5 sum of an original file, you must calculate your copy’s MD5 sum to check if it’s a match.

How to Calculate Checksums

If you know the checksum of an original file and want to check it on your PC, you can do so easily. Windows, macOS, and Linux all have built-in utilities for generating checksums. You don’t need any third-party utilities.
On Windows, PowerShell’s Get-FileHash command calculates the checksum of a file. To use it, first open PowerShell. On Windows 10, right-click the Start button and select “Windows PowerShell.” You can also launch it by searching the Start menu for “PowerShell” and clicking the “Windows PowerShell” shortcut.
Update: Get-FileHash is included with Windows 10. But, on Windows 7, you’ll have to install the PowerShell 4.0 update to get it.
At the prompt, type Get-FileHash and then press your space bar.
Type the path of the file you want to calculate the checksum for. Or, to make things easier, drag and drop the file from a File Explorer window onto the PowerShell window to automatically fill in its path.
Press Enter to run the command, and you’ll see the SHA-256 hash for the file. Depending on the size of the file and the speed of your computer’s storage, the process may take a few seconds.
If you need another type of checksum, add the appropriate -Algorithm option to the end of the command, like so:
Get-FileHash C:\path\to\file.iso -Algorithm MD5
Get-FileHash C:\path\to\file.iso -Algorithm SHA1
Compare the calculated checksum to the original one. You shouldn’t have to look too close, as there will be a massive difference in the checksum even if there’s only a tiny difference in the underlying file.
If the checksum matches, the files are identical. If not, there’s a problem—perhaps the file is corrupted, or you’re just comparing two different files. If you downloaded a copy of the file and its checksum doesn’t match what you expect, try downloading the file again.

Friday, January 17, 2020

How To Get an Item Count in Google Sheets

https://campustechnology.com/articles/2014/04/23/how-to-get-an-item-count-in-google-sheets.aspx


Here's a quick and dirty formula you can use in Google Sheets to get a running count of cells that contain any value (numbers, dates, text, links, etc.).
As an example, we'll create a little ersatz gradebook that will track the number of assignments that have been completed by a given student, then use that information to calculate a running average score (in other words, an average for only the assignments that have been completed).
This gradebook is, of course, for illustrative purposes only. This formula can be used to count anything in a spreadsheet over any range. It's also applicable across platforms and could easily be used in desktop tools like LibreOffice or Microsoft Excel.
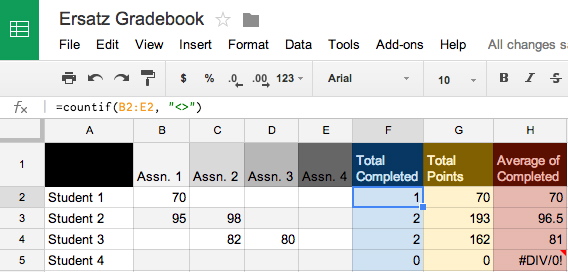
 item count example in google sheets
The figure above shows our sample spreadsheet. In Column F, as you can see, we're counting the number of assignments completed using this formula:
=countif(B2:E2, "<>")
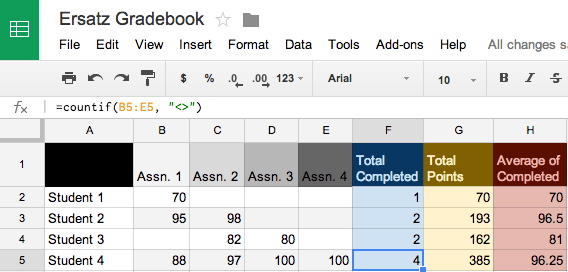
That simply creates a count of non-empty cells within a given range — in this case B2 to E2, in the next row down B3 to E3, in the one after that B4 to E4, etc. Those totals will automatically update any time a new score is added, as seen in the image below.
 sum example in google sheets

Time-saving tip: Once you insert the formula, you can select the cell, copy it, and paste to to a new row, an the cell range will automatically shift to the correct row. If instead you want to keep the original range, then double-click the cell and copy the text out of it, then paste it into a new cell.
The rest of it is very straightforward, but I'll explain it for those who might not be familiar with equations in spreadsheets.
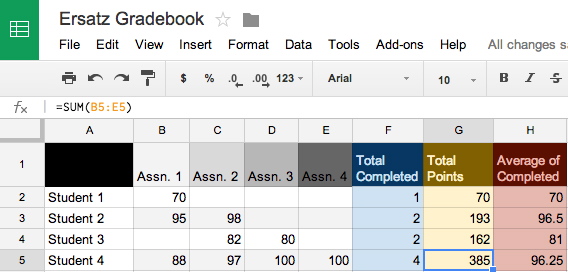
In column G, "Total Points," we're simply using the SUM function and specifying the range of cells whose values we want to add together. That is illustrated in the figure below.
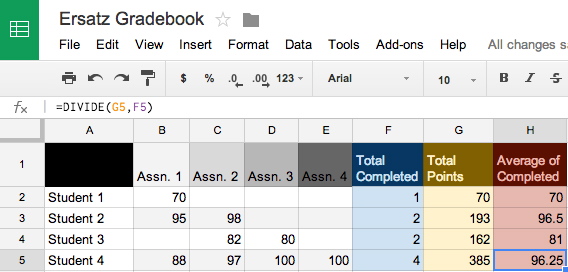
 divide example in google sheets
And then, finally, we're dividing the accumulated points (column G) by the total number of completed assignments (column F) in order to calculate a running average. This is done using the DIVIDE function, pictured below.
 item count example in google sheets
That's it! If you run into any trouble, ask me a question in the comments section below.